Update 10/28/2013 6:30PM CDT - I have been in contact with Linkedin’s security team and a hotfix has recently been released to address the findings below. This fix applies the styling rules to a randomly generated ID, as opposed to the class based styling seen below. This provides more specificity in applying the rules, making it more difficult to override.
I am no CSS expert so there could very well be tricks to still get around this and remove the content (or even just hide it and overlap it) - email me if you know of one! I will be continuing my work with Linkedin’s security team to iron out any bugs we can find. Users are reminded that no solution is perfect, and that seeing this data in an email in no way definitively proves the senders legitimacy.
I would also like to thank Linkedin’s security team for their quick and effective response to these findings.
“Intro"duction
On October 23, Linkedin introduced an application called “Intro”. The premise is simple: allow iPhone users to see details about the people they are emailing within the native iPhone Mail App. Think Rapportive for the iPhone Mail App, because that’s essentially what this is (and made by the same people).
However, when reading the initial description of Intro, there was one part that caught my eye:
David says Crosswise would love to work with you. Is this spam, or the real deal?
With Intro, you can immediately see what David looks like, where he’s based, and what he does. You can see that he’s the CEO of Crosswise. This is the real deal.
This is not much different than Linkedin saying “we’ve put a picture of a lock in your email, so you know for sure it’s secure”. Linkedin is simply giving its users a false sense of security. In this post, we’ll take a look and see what exactly Linkedin is doing to its users’ email, as well as how we can spoof this information, gaining full control of the information shown to the user.
What Linkedin Does to Your Email
While I am currently performing a much more in-depth analysis of Intro which will give a much better look into its behavior (to be posted soon), for now we will just take a look at the basics of how Intro works, and look specifically into how it manipulates user’s email.
Intro works by first obtaining an OAuth access token to manage your email. They can get away with not asking for your Gmail password since Google implemented OAuth support into Gmail’s IMAP and SMTP. After Linkedin can access your email, they install a security profile onto your iPhone. The most notable feature of this security profile is that it installs a new email account pointing to Linkedin’s IMAP and SMTP servers. I’m not sure of a way to recover the email account password from the iPhone itself, but by intercepting the profile sent to the iPhone via a proxy, we can see that this email account looks like this:
<dict>
    <key>PayloadDisplayName</key><string>Email Settings</string>
    <key>PayloadType</key><string>com.apple.mail.managed</string>
    <key>PayloadVersion</key><integer>1</integer>
    <key>PayloadUUID</key><string>[redacted]</string>
    <key>PayloadIdentifier</key><string>com.rapportive.iphone.settings.email.[redacted]</string>
    <key>EmailAccountName</key><string>Test Account</string>
    <key>EmailAccountType</key><string>EmailTypeIMAP</string>
    <key>EmailAddress</key><string>[email protected]</string>
    <key>EmailAccountDescription</key><string>Gmail +Intro</string>
    <key>IncomingMailServerAuthentication</key><string>EmailAuthPassword</string>
    <key>IncomingMailServerHostName</key><string>imap.intro.linkedin.com</string>
    <key>IncomingMailServerPortNumber</key><integer>143</integer>
    <key>IncomingMailServerUseSSL</key><true/>
    <key>IncomingMailServerUsername</key><string>[username_redacted]</string>
    <key>IncomingPassword</key><string>[password_redacted]</string>
    <key>OutgoingPasswordSameAsIncomingPassword</key><true/>
    <key>OutgoingMailServerAuthentication</key><string>EmailAuthPassword</string>
    <key>OutgoingMailServerHostName</key><string>smtp.intro.linkedin.com</string>
    <key>OutgoingMailServerPortNumber</key><integer>587</integer>
    <key>OutgoingMailServerUseSSL</key><true/>
    <key>OutgoingMailServerUsername</key><string> Gmail +Intro ?[username_redacted]</string>
    <key>OutgoingPassword</key><string>[password_redacted]</string>
</dict>
By intercepting the profile, we can get the username and password used to log into Linkedin’s IMAP (imap.intro.linkedin.com) and SMTP (smtp.intro.linkedin.com) services. The username was a base64 encoded string, and the password was a 32 character hash.
Here’s a diagram of how this works:
Now that we have the username and password used for this mail account, let’s grab the first email and see what content Linkedin’s IMAP proxy injects into it. We can do this with OpenSSL.
# openssl s_client -connect imap.intro.linkedin.com:143 -starttls imap -crlf -quiet
depth=2 C = US, O = "thawte, Inc.", OU = Certification Services Division, OU = "(c) 2006 thawte, Inc. - For authorized use only", CN = thawte Primary Root CA
verify error:num=19:self signed certificate in certificate chain
verify return:0
. OK More capabilities after LOGIN
a LOGIN username_redacted password_redacted
* CAPABILITY IMAP4rev1 IDLE NAMESPACE ID CHILDREN UIDPLUS COMPRESS=DEFLATE
A OK [email protected] Test Account authenticated (Success)
b SELECT INBOX
* FLAGS (\Answered \Flagged \Draft \Deleted \Seen)
* OK [PERMANENTFLAGS (\Answered \Flagged \Draft \Deleted \Seen \*)] Flags permitted.
* OK [UIDVALIDITY 1] UIDs valid.
* 4 EXISTS
* 0 RECENT
* OK [UIDNEXT 5] Predicted next UID.
* OK [HIGHESTMODSEQ 1049]
b OK [READ-WRITE] INBOX selected. (Success)
c FETCH 4 BODY[]
* 4 FETCH (FLAGS (\Seen) BODY[] {36510}
email_content_here
As it turns out, Linkedin injects quite a bit of content into your email. The basic structure looks like this:
<!DOCTYPE html PUBLIC "-//W3C//DTD HTML 4.0 Transitional//EN" "http://www.w3.org/TR/REC-html40/loose.dtd">
<html>
	<head>
	    <meta http-equiv="Content-Type" content="text/html; charset=utf-8">
	    User specified CSS (if any)
	    <style type="text/css">
	        /*BEGIN RAPPORTIVE*/
	        Injected Linkedin Intro CSS
	        /*END RAPPORTIVE*/
	    </style>
	</head>
	<body>
	    <!--BEGIN RAPPORTIVE-->
	    Injected Linkedin Intro HTML Content
	    <!--END RAPPORTIVE-->
	    Original Message
	</body>
</html>
You can find the full email here (some links and what-not have been redacted). Now that we know what Linkedin does to the email, let’s see how we can use it to make our phishing emails appear to be legitimate.
Setting up the Bait
Just like setting up a spoofed website, we can simply copy the existing CSS and HTML structure provided by Linkedin, and repurpose it for our needs. The first thing we will want to do is to find a way to get rid of the existing Intro data. We can do this by setting the CSS for the existing Intro block to display:none;. Unfortunately for us, Linkedin obviously considered this, since the CSS is usually injected at the end of our head block, and they were pretty specific in ensuring the !important keyword is set for things such as the display, height, etc.
But they weren’t specific enough. If we look at the CSS, we can see that the rules apply to the #rapportive.iphone element. If we look closely, we can see that in fact the HTML element we want to hide has a full spec of #rapportive.rapportive.topbar.iphone. Therefore, we can simply set the following style block to hide the element:
<style type="text/css">
    #rapportive.rapportive.topbar.iphone {
        display:none !important;
    }
</style>
Easy as that.
Now that we have removed the existing Intro data, we are free to inject our own. To do this, we can copy the existing HTML provided by Linkedin. To make sure that our data is not hidden by our previous CSS, we can simply remove the topbar class from the root element, since it will have no effect on styling. The last things we will want to do are to clean up the margins Linkedin puts on the original message, as well as changing the actual data itself to be whatever we want. In addition to this, I copied some of the CSS and HTML and changed the IDs which are generated automatically. This will make sure our template is always consistent.
Going Phishing
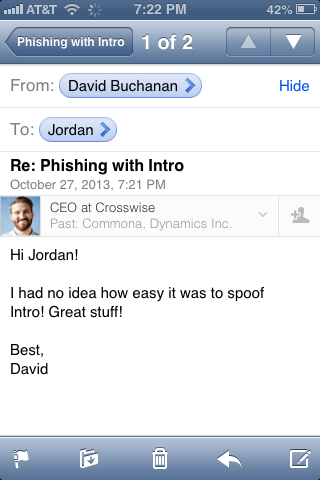
I’ve taken the liberty of setting up a basic PoC template for educational purposes. To use it, just visit the Linkedin profile for the person you are pretexting as, and fill in the CSS information as needed. Ideally, in the future there could be improvements to automatically scrape this information, check to make sure that the Intro data is only shown on mobile devices, etc. For now - it works. Let’s see what it looks like if I spoof the example from Linkedin’s original post, David (pardon the non-IOS7 - I don’t see any major IOS7 styling issues which would cause much trouble):
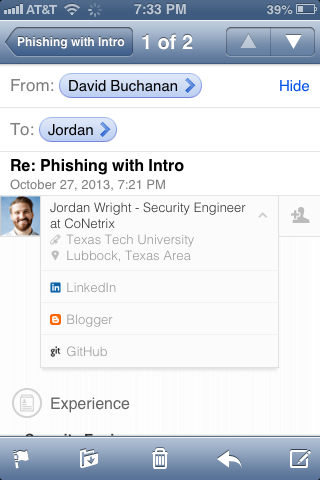
Here’s what the details look like when I open the Intro tab (they are customizable as well - I left them as me to show that I really do control the content):
Obviously, this was an extremely benign example. It would be just as easy to attach a malicious payload, request sensitive information, etc.
Final Thoughts
While Linkedin Intro seems like it would be useful on the surface - the security risks of using it are simply too high. With that being said, as a social engineer, I hope my targets use Intro. By giving users a false sense of security when they see the Intro information in an email, Linkedin has made my pretext much stronger and the SE engagement that much easier.
I have yet to get comments setup on the new blog, but shoot me an email if you have any questions or comments!
Jordan (@jw_sec)


