
It’s been a while! While I haven’t posted as much here, I have been writing quite a bit over on Duo’s blog about the really cool research I’ve gotten to do this past year with the incredible Duo Labs team.
Any spare time I’ve had has been spent working on Gophish. This past year I’ve released a new hand-crafted, artisinal website, responded to nearly 400 support requests, and made too many improvements to count!
Now, most people who use Gophish use a pre-built binary*, which means that it’s important to make new releases as soon as possible after improvements are made. Otherwise, I’m left answering support requests with the advice of “build from source”, which is not ideal.
The previous release process was manual, making it a huge pain. This led to inconsistency and large amounts of time spent packaging every release, which results in very infrequent releases.
This post documents the previous process as well as how I recently improved it using Ansible, Docker, DigitalOcean API’s, and more.
How Gophish Releases Are Made
At a high level, the previous (completely manual) release process for Gophish was something like this:
- Spin up a new DigitalOcean droplet
- Install Go
- Install Docker
- Clone the current
masterbranch in Gophish - Build cross-compiled binaries using xgo
- Manually package the binaries and static assets into a zip (or tar.gz) archive
- Get the hash for all the archives
- Upload the assets and their hashes to Github
Now, before the pitchforks come out explaining how I should have been doing [insert devops concept], keep in mind that at the time the process worked and successfully made Gophish releases. I started from doing everything completely manually, and moved to a hacky Bash script that I can copy/paste commands from.
The lesson here is to start somewhere. Automation (and security!) is a process. Keep improving and making small steps, and eventually you’ll be miles ahead of where you started.
This post describes another one of those small steps.
The Goal
In a perfect world, I’d like a process something like this:
- Create a new release on Github and write the changelog
- Run a command indicating the release number
- Binaries are automatically compiled and archives are created
- The assets are automatically uploaded to Github
In a nutshell, this process will basically be automating the manual flow I used previously.
Note: I could consider automating the changelog, but I think there’s value in personally writing release notes that give your project a voice.
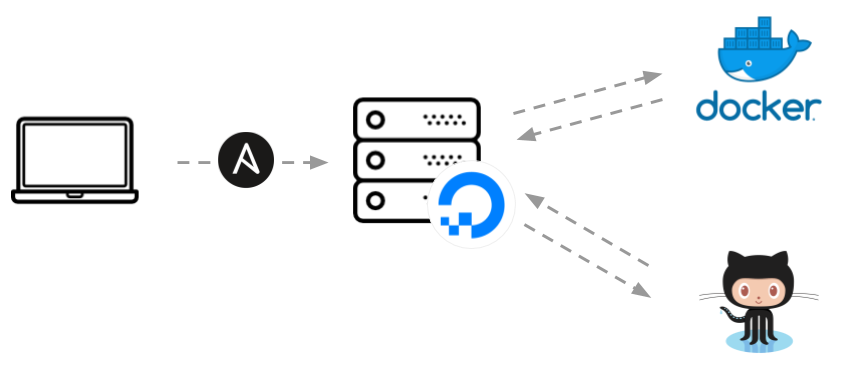
Automating the Setup with Ansible
We’ll leverage Ansible to do the heavy lifting. Ansible is an automation framework that makes configuration management and deployment easy.
You can find the final release files here, but let’s see how we can build the process from scratch. We’ll do everything from a new folder, release-scripts/, where we’ll set up the following directory structure:
ansible
├── roles
│   └── release
│       ├── files
│       │   └── upload_release.py
│       ├── tasks
│       │   └── main.yml
│       └── vars
|           └── main.yml
└── site.yml
Note: I’m using Ansible on Windows through the Windows Subsystem for Linux (WSL). I installed Ansible using this tutorial.
Setting up the Droplet
With the directories created and Ansible up and running, we can define the tasks that we want to run. Ansible works by defining playbooks containing multiple tasks to execute. We’ll keep the first set of tasks in a file called site.yml.
The first task we need to build is to automatically create a DigitalOcean droplet. Ansible provides a digital_ocean module, making it easy to interact with DigitalOcean droplets. This article gives a good, quick overview of how to use Ansible and DigitalOcean together.
The first step is to ensure we have our SSH key generated, and uploaded to our DigitalOcean account:
- hosts: localhost
  connection: local

  tasks:
    - name: ensure ssh key exists
      user:
        name: "{{ ansible_user_id }}"
        generate_ssh_key: yes
        ssh_key_file: .ssh/gophish_dev
        ssh_key_bits: 4096

    - name: ensure ssh key is uploaded to DigitalOcean
      digital_ocean:
        state: present
        command: ssh
        name: gophish-dev
        ssh_pub_key: "{{ lookup('file', '~/.ssh/gophish_dev.pub') }}"
        api_token: "{{ do_token }}"
        register: gophish_ssh_key
The first task ensures there’s an 4096 bit SSH key at ~/.ssh/gophish_dev, creating a new one if necessary. Then, the next task makes sure that the SSH key is uploaded to DigitalOcean using Ansible’s digital_ocean module.
A Quick Note About Secrets
You’ll notice the reference to the variable {{ do_token }}. This is my DigitalOcean API token, which ideally should only be accessible in memory when it’s needed.
To manage secrets, I used Ansible Vault. You can find information on how to use Vault in playbooks here.
Ok, Back to the Tasks
With our SSH key uploaded, we can define a task that creates the droplet and adds our SSH key.
- name: create the droplet used to build releases
  digital_ocean:
    state: present
    command: droplet
    name: gophish-release
    api_token: "{{ do_token }}"
    size_id: s-1vcpu-1gb
    region_id: nyc1
    image_id: debian-9-x64
    wait_timeout: 500
    ssh_key_ids: "{{ gophish_ssh_key.ssh_key.id }}"
    unique_name: yes
  register: gophish_droplet

- add_host:
    name: "{{ gophish_droplet.droplet.ip_address }}"
    groups: droplets
    ansible_ssh_private_key_file: ~/.ssh/gophish_dev
After creating the droplet using the DigitalOcean API, we can use the add_host module to add the new droplet to a group called droplets so future tasks can operate on the droplet.
With the droplet created, we can start configuring everything. This involves:
- Updating tools via
apt-get - Installing
gitanddocker - Cloning the Gophish repository from Github
For the first two, I won’t bore you with the details. You can find them in the release files - it’s basically just standard apt usage.
Note: The rest of these tasks will be under the
release/directory, since we’re assigning the “release” role to the droplet we just created. This helps us organize our tasks and variables in a meaningful way.
Speaking of variables, we’ll use these variables in the rest of the tasks:
gophish_golang_package: "github.com/gophish/gophish"
gophish_directory: "/root/go/src/{{ gophish_golang_package }}"
# I have one of these variables for every architecture and x86/x64
gophish_ARCH_XXbit: "{{gophish_directory}}/bin/gophish-{{version}}-ARCH-XXbit.zip"
Let’s jump to the fun stuff, starting with cloning the latest code from Github:
tasks:
  - name: clone the gophish repo
    shell: "/usr/local/go/bin/go get {{ gophish_golang_package }}"
With the latest code in our $GOPATH, we can build it using Docker.
Compiling the Binaries
Two of the best things about building Gophish in Go are that it compiles to a single binary, and I can “easily” cross-compile binaries for different platforms. So, I can, for example, compile a Windows binary from a Linux host. Neat.
But, there’s a wrench thrown in anytime you try to compile code that uses cgo. The library Gophish uses to manage the SQLite database, github.com/mattn/sqlite3, does just that.
So, we need to do a bit more legwork in order to cross-compile Gophish, but fortunately for us there is tooling available that makes that easier. One of these tools is xgo, which uses Docker to handle the more complex aspects of cross-compiling cgo dependencies.
The tooling provides a command line wrapper around the underlying Docker commands being run, but for our purposes we’ll just invoke the container directly using Ansible’s docker_image and docker_container modules.
- name: download the xgo docker image
  docker_image:
    name: "{{ xgo_image }}"

- name: build gophish
  docker_container:
    name: "gophish_build"
    image: "{{ xgo_image }}"
    auto_remove: true
    volumes:
      - "{{ gophish_directory }}/bin:/build"
      - "/root/.xgo-cache:/deps-cache:ro"
    env:
      TARGETS: "linux/386 linux/amd64 windows/386 windows/amd64 darwin/386 darwin/amd64"
    command: "github.com/gophish/gophish"
These tasks run the xgo container, building both the x86 and x64 binaries for Windows, OSX, and Linux. Once the binaries are built, I set up Ansible tasks to create ZIP archives with all the necessary static assets, and our Gophish releases are ready to be uploaded!
Uploading the Assets
After all the binaries are compiled and packaged with our static assets, the last thing to do is to upload the releases to Github. To do this, I created a simple Python script using the PyGithub library that leveraged Github’s Releases API to upload the assets.
You can find the script here.
Putting the script in the files/ directory within the Ansible role makes it easy to reference from the Ansible tasks. Here’s the task that executes the script, uploading each file to Github:
- name: upload assets to github release
  shell: >
    {{upload_release}} --repo gophish/gophish --version {{ version }}
    --assets {{ gophish_windows_32bit }} {{ gophish_windows_64bit }}
    {{ gophish_linux_32bit }} {{ gophish_linux_64bit }}
    {{ gophish_osx_32bit}} {{ gophish_osx_64bit }}
  environment:
    github_api_key: "{{github_token}}"
  register:
    upload
All that’s left is to run the playbook! This is done using a command like this:
$ ansible-playbook site.yml --extra-vars "version=v0.5.0" --ask-vault-pass
Conclusion
I’m not going to pretend that this is a perfect solution. It’s not. However, it’s better than the previous manual process and that’s the important thing. This will allow more frequent and consistent releases, letting users get the benefits of new changes much quicker than before.
-Jordan (@jw_sec)
* I have absolutely no data to back this up, but it sounds good.